
A drawstring bag may look simple, but its performance depends on how several components work together. The cord determines how the opening gathers and, on backpack-style bags, may also carry the load. The casing guides the cord, the bottom defines the available volume, and the seams, exits, anchors, and reinforcement points determine how well the finished bag withstands repeated use.
For custom bag buyers, these details matter more than the style name alone. Two products described as drawstring bags may have different panel layouts, cord paths, bottom structures, and reinforcement methods. Those differences affect functionality, production complexity, sampling requirements, and the specifications a manufacturer needs to prepare an accurate quotation.
This guide explains drawstring bag construction from a manufacturing perspective. It covers the main components, common structural variations, sewing and reinforcement options, and the design decisions buyers should confirm before placing a custom order.
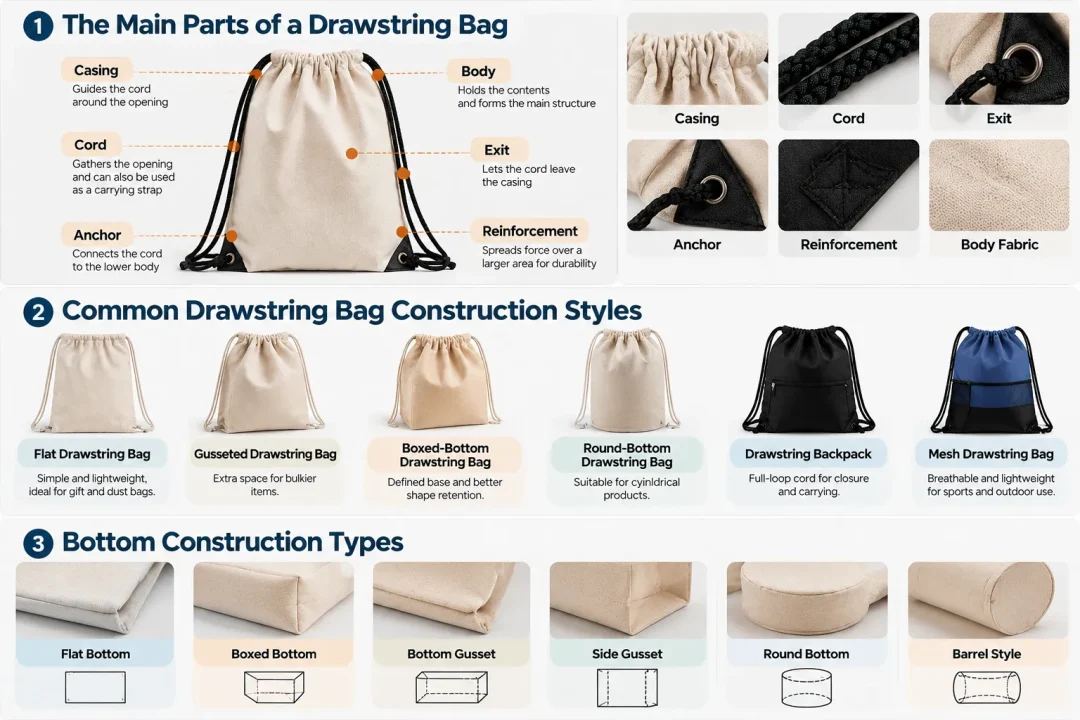
1. What Are the Main Parts of a Drawstring Bag?
A drawstring bag can be divided into six functional components: the body, casing, cord, cord exit, anchor, and reinforcement. Not every bag requires a separate anchor or reinforcement patch, but distinguishing these components helps buyers describe the intended construction more precisely.
| Component | Main function | Key specifications |
|---|---|---|
| Bag body | Holds the contents and forms the main structure | Finished dimensions, panel layout, fabric, weight |
| Drawstring casing | Guides the cord around the opening | Casing height, tunnel layout, fold, clearance |
| Drawcord | Gathers the opening or provides a carrying function | Material, construction, diameter, length, end finish |
| Cord exit | Allows the cord to leave the casing | Exit type, opening size, edge finish |
| Anchor | Connects a carrying cord to the lower body | Position, attachment method, dimensions |
| Reinforcement | Distributes stress around high-load or high-wear areas | Patch material, stitch pattern, size, placement |
The most important distinction is between components that guide movement and components that carry force. A casing must allow the cord to slide, while an anchor must transfer the carrying load into the bag body. A visually neat construction is not necessarily a mechanically reliable one.
For example, a bag made from durable 600D polyester can still fail if its lower cord anchors pull through the fabric. Likewise, a well-reinforced body will not compensate for a narrow or poorly finished casing that repeatedly catches the cord.
1.1 Bag Body and Fabric Panels
The body determines the bag’s dimensions, overall shape, and available space. Its construction may use two main panels, a folded piece of fabric, or several panels joined together to create a gusseted, rounded, or cylindrical shape.
A simple flat pouch can often be made from two panels joined along the sides and bottom. A bag with a separate bottom or side gusset requires additional pieces and seams, while a cylindrical design may need circular end panels.
When specifying the body, buyers should confirm:
- Finished width and height, including how the dimensions are measured.
- Number and arrangement of fabric panels.
- Material composition, fabric weight, and surface finish.
- Whether the bag has a flat, boxed, gusseted, or round bottom.
- The intended usable space after accounting for the casing and gathered opening.
Panel count is not merely a sewing detail. It influences fabric consumption, seam placement, shape, and the amount of work required during assembly.
1.2 Drawstring Casing or Channel
The casing is the folded and stitched section of fabric at the top of the bag. The passage inside it, often called the channel or tunnel, allows the cord to move around the opening.
These terms are related but not identical: the casing is the sewn fabric structure, while the channel is the space through which the cord travels.
Three dimensions should be considered separately:
- Finished casing height: The visible height of the sewn casing.
- Usable bag height: The space available for the contents below the casing and gathered opening.
- Clear internal passage: The space available for the cord to move through the channel.
A casing that is too narrow may create excessive friction, while one that is poorly matched to the cord and fabric may allow the opening to gather inconsistently. Seam allowances, lining layers, fabric coatings, and the cord’s surface texture can all affect how smoothly the cord moves.
There is no single casing height suitable for every drawstring bag. The appropriate dimensions should be developed around the cord, material, construction method, and intended function, then verified on a physical sample.
1.3 Drawcords and Closure Components
The cord gathers the bag opening and may also function as a carrying strap. Its material, shape, diameter, and construction should therefore match the intended use.
Common options include:
- Braided cord: A compact construction that can offer good resistance to fraying and abrasion, depending on the fiber and braid.
- Twisted cord: A familiar option for lightweight pouches, gift bags, and simple promotional bags.
- Flat cord or webbing: Provides a wider contact area and may be useful when comfort or a particular appearance matters.
- Cord locks and toggles: Help control the opening and can reduce the need to tie a knot.
- Knots, aglets, or other end finishes: Help manage the cord ends and reduce unwanted fraying or unraveling.
Cord diameter alone does not determine quality. A thicker cord may be more comfortable to carry but may also create more friction inside the casing. A thin cord may work well on a lightweight pouch but feel uncomfortable when used as a shoulder strap.
Buyers should specify the cord’s material, construction, diameter or width, total path length, exposed tail length, and end treatment. If the cord also serves as a strap, the loaded carrying configuration should be assessed during sampling.
1.4 Cord Exits
The exit is the point where the cord leaves the casing. It is different from the cord end: the exit belongs to the bag, while the cord end is the finished end of the cord itself.
Common exit designs include:
- An open casing end at the side seam.
- A reinforced gap in the side seam.
- A stitched buttonhole.
- A bound or faced opening.
- A metal eyelet or grommet.
- A fabric or webbing loop integrated into the seam.
Each option creates a different balance between appearance, abrasion resistance, construction complexity, and cost.
A simple casing exit can be suitable for lightweight bags with limited opening and closing. An eyelet may provide a durable contact surface for the cord, but it requires a correctly sized opening and appropriate backing or reinforcement. A poorly supported eyelet can still pull out or damage the surrounding fabric.
When hardware is used, a drawing or sample is more reliable than a component name alone. Buyers should confirm the external flange diameter, clear opening, barrel dimensions, finish, and whether a separate washer is required.
1.5 Anchors and Reinforcement
Anchors and reinforcement are especially important on full-loop drawstring backpacks, where the cord extends down the bag and attaches near the lower corners.
The anchor connects the cord to the body. Reinforcement spreads the force around that connection so the load does not concentrate on a small area of fabric or a single stitch line.
Common reinforcement methods include:
- Bar tacks at cord attachment points.
- Box-X stitching over anchor patches.
- Additional parallel stitch rows.
- Fabric or webbing reinforcement patches.
- Interfacing or backing layers behind eyelets and high-stress areas.
More stitching does not automatically mean greater strength. Dense stitching can create stiff areas or additional needle holes, and a reinforcement patch with poorly designed corners may still concentrate stress.
The reinforcement method should suit the fabric, load direction, and location. A lightweight pouch may need little additional reinforcement, while a backpack-style bag requires greater attention to the cord anchors and the surrounding seams.
2. Drawstring Bag Construction Styles
Drawstring bags are often classified by their use, such as gym sacks, dust bags, gift pouches, or laundry bags. For manufacturing and sourcing, however, the construction is a more useful starting point.
The following categories describe how the cord travels and how the body is assembled. They are not mutually exclusive: a gusseted bag can use a double drawstring, while a backpack can have a flat or shaped bottom.
2.1 Single Drawstring Construction
A single-drawstring design uses one cord routed through the casing, with one or more exits arranged according to the pattern.
Pulling the cord gathers the opening. Depending on the configuration, a knot, cord lock, or the friction between the cord and casing may help keep the opening closed.
This construction is commonly used for lightweight gift pouches, jewellery bags, dust bags, and simple promotional packaging.
Advantages
- Relatively simple construction.
- Fewer cord components.
- Suitable for lightweight contents.
- Often economical for basic pouch designs.
Considerations
- The opening may gather unevenly.
- Closure performance depends on the cord, casing, and finishing method.
- A single top drawstring should not be mistaken for a load-bearing backpack strap.
2.2 Double Drawstring Construction
A double-drawstring bag uses two cords routed through the upper casing, usually entering and exiting from opposite sides.
When the cords are pulled apart, the opening can gather more evenly than a basic single-cord arrangement. This configuration is common on gift bags, storage pouches, and retail packaging.
The way the cords pass through the casing matters. They may share one passage or run through separate tunnels. A shared passage can reduce construction complexity, while separate tunnels can help prevent the cords from crossing and reduce interference between them.
The trade-off is that separate tunnels may require a taller casing and additional sewing operations.
For a custom order, the specification should identify the number of cords, exit positions, tunnel arrangement, and finished cord length rather than simply stating “double drawstring.”
2.3 Full-Loop Drawstring Backpack Construction
A drawstring backpack, sometimes called a cinch backpack, uses the cord for both closure and carrying. The cord passes through the top casing and continues down the bag, where it is anchored near the lower corners.
This creates a different load path from a pouch. When the bag is carried, force travels through the cord, anchor points, reinforcement, and body seams.
Key construction considerations include:
- Cord width or diameter and the resulting shoulder comfort.
- Lower anchor placement and reinforcement.
- Fabric strength and seam construction.
- Casing clearance and closure performance.
- Whether the loaded bag can be carried without excessive pressure on the shoulders.
The cord is responsible for two functions, so a failure can affect both the closure and the carrying system. Buyers should test the anchors and cord under the intended carrying conditions instead of relying on appearance alone.
A standard flat pouch with a cord at the top is not structurally equivalent to a backpack with a full-loop cord and reinforced lower anchors, even if both are marketed as drawstring bags.
2.4 Comparing Cord Paths
| Feature | Single drawstring | Double drawstring | Full-loop backpack |
|---|---|---|---|
| Main purpose | Simple closure | Balanced gathering | Closure and carrying |
| Cord arrangement | One cord | Two cords | One continuous loop or a configured strap system |
| Lower anchors | Usually none | Usually none | Required for the typical backpack construction |
| Main consideration | Closure retention | Cord routing and even gathering | Anchor strength and carrying comfort |
| Typical applications | Dust bags, gift pouches | Storage and retail pouches | Gym sacks and promotional backpacks |
The best configuration depends on what the cord needs to do. A simple pouch does not need backpack-style anchors, while a bag designed to carry books or sportswear should not rely on a closure-only construction.
3. How the Casing and Cord Work Together
The casing and cord form a mechanical system. Even if both components are individually suitable, their interaction can still cause problems.
A cord that is too large for the channel may drag or become difficult to pull. A cord that is too small, combined with an unsuitable casing or fabric finish, may gather the opening poorly or fail to maintain the desired closure.
The casing should provide sufficient clearance for the cord, the fabric layers, and the seam allowances inside the tunnel. Coated fabrics, thick braided cords, lining layers, and bulky seam intersections can all change the amount of clearance required.
3.1 Shared, Separate, and Segmented Tunnels
Three arrangements are useful to distinguish.
Shared tunnel: Both cords travel through the same passage. This can simplify the casing but may allow the cords to cross or rub against one another.
Separate tunnels: Each cord has its own passage. This can improve cord separation and gathering symmetry, although it may require additional fabric height and sewing.
Segmented tunnel: The cord passages are separated in selected areas rather than along the entire opening. This can be useful when the design needs to control cord movement without adding a full second tunnel.
The choice should account for the casing height, number of cords, fabric thickness, and desired opening width. The side seams also need attention: bulky seam allowances or poorly finished intersections can obstruct the cord path.
3.2 Casing Fold and Finish
The casing can be formed with a single fold, a double fold, or a construction that encloses the raw edges more completely.
A double fold can help contain raw edges on lightweight fabrics. A single fold may be suitable for fabrics that hold their shape, provided the edge is finished appropriately. Lined bags may require a different casing sequence because the lining adds another layer around the mouth.
The finished height should be specified separately from the amount of fabric consumed by the fold. Otherwise, two samples can use the same nominal measurement while producing different usable bag heights.
3.3 Managing Internal Seam Allowances
Seam allowances inside the casing can catch the cord, especially where side seams intersect the tunnel.
To reduce this risk, the manufacturer may trim, press, or position the seam allowances so the passage remains smooth. The appropriate treatment depends on the fabric thickness, coating, seam type, and number of layers.
A visual inspection is not enough. A casing can look neat while still creating friction when the bag is gathered.
During sampling, pull the cord repeatedly through the opening, including when the bag contains the intended contents. Check whether the cord moves consistently, whether the fabric gathers evenly, and whether any seam intersection catches the cord.
4. Bottom Construction: Flat, Boxed, Gusseted, Round, and Barrel
The bottom construction determines how the bag develops depth, how it accommodates bulky contents, and whether it can maintain a defined shape.
It also affects the number of pattern pieces, the placement of seams, fabric consumption, and production complexity.
4.1 Flat Bottom Construction
A basic flat pouch is commonly made from two panels joined along the sides and bottom, or from a folded panel with fewer seams.
When empty, it has little or no built-in depth. Its shape develops as the contents push the panels apart.
Advantages
- Simple pattern and assembly.
- Easy to pack and store flat.
- Suitable for thin, soft, or flexible contents.
- Often appropriate for basic gift and dust bags.
Limitations
- Limited built-in volume.
- Less suitable for bulky items with a defined shape.
- Bottom corners may experience concentrated stress during carrying.
Flat construction is useful when compact storage and low structural complexity matter more than the ability to stand upright.
4.2 Boxed-Bottom Construction
A boxed bottom is commonly formed by sewing the bottom corners across after cutting or folding them into a suitable shape. This creates a more defined base than a flat pouch.
It can help a bag accommodate rectangular products and may improve its ability to stand, depending on the fabric stiffness and base geometry.
However, a boxed bottom does not guarantee that the bag will stand upright. A soft fabric may collapse even when the base has a rectangular shape.
When standing stability matters, specify the base dimensions and consider whether a stiffening layer is appropriate. A separate bottom panel may add volume, but it should not automatically be treated as equivalent to a boxed or gusseted construction.
4.3 Gusseted Construction
A gusset is a fabric panel or section that creates depth between the main body panels. It can be placed at the bottom, along the sides, or around multiple sides.
- Bottom gusset: Adds depth while preserving a relatively narrow front-facing silhouette.
- Side gusset: Adds width and allows the bag to accommodate bulkier contents.
- All-side gusset: Creates a more box-like body with a defined base and side depth.
Gussets can improve usable space, but they add seams and require careful panel alignment. The depth should be based on the intended contents rather than selected arbitrarily.
For example, a bag designed for boxed products may benefit from a defined bottom gusset, while a lightweight pouch for soft accessories may not need one.
4.4 Round-Bottom Construction
A round-bottom bag uses a circular or oval base joined to a tubular or shaped body.
This construction can suit cylindrical products, bottles, cosmetics, yarn, and other items with a rounded footprint.
The main manufacturing challenge is distributing the body fabric evenly around the base. Poor alignment can create puckering or uneven seams.
If the bag needs to maintain its shape, the base may require additional stiffness. That decision should be made together with the fabric choice and intended contents.
4.5 Barrel-Style Construction
A barrel-style drawstring bag has a cylindrical body, typically with a circular base and a drawstring opening at the top. Some designs may also incorporate handles or a separate carrying strap.
Its shape can accommodate bulky contents without requiring a rectangular footprint. Potential applications include laundry bags, cosmetic storage, and certain duffel-style designs.
The circular seams require careful alignment, and the body dimensions should be based on the shape of the intended contents.
A barrel bag with separate handles also needs a clear load path. The handles may carry most of the weight, so the drawstring should not automatically be treated as the primary carrying component.
4.6 Comparing Bottom Constructions
| Construction | Built-in depth | Shape retention | Main production consideration | Suitable applications |
|---|---|---|---|---|
| Flat | Minimal | Low | Simple panel assembly | Dust bags, gift pouches |
| Boxed | Defined base | Depends on fabric and stiffening | Accurate corner construction | Retail pouches, boxed products |
| Bottom gusset | Added depth | Moderate, depending on fabric | Gusset alignment and seam bulk | Bottles, boxed sets |
| Side gusset | Added width | Moderate to high | Additional side seams | Storage and gym bags |
| All-side gusset | Three-dimensional body | Higher when appropriately constructed | More panels and seams | Bulky contents and structured bags |
| Round bottom | Circular base | Depends on base stiffness | Evenly easing the circular seam | Cosmetics, bottles, yarn |
| Barrel | Cylindrical volume | Depends on body and end construction | Circular seam alignment | Laundry and cylindrical storage |
Capacity should not be estimated from flat width multiplied by height alone. The casing consumes part of the overall height, and the amount of usable space depends on the bottom depth, contents, and way the fabric expands.
For a product-specific capacity requirement, filling and measuring a physical sample is more reliable than converting flat dimensions into a claimed volume.
5. Seams, Stitching, and Reinforcement
The seams hold the bag body together, while reinforcement helps manage the forces created by carrying, pulling, and repeated opening and closing.
Both should be considered when developing a specification.
5.1 Common Seam Finishes
Overlock seams
An overlock encloses the raw edge with a serged stitch. It can be suitable for lightweight linings, non-woven materials, and economical unlined bags. The finish is visible inside the bag, and the seam ends need to be secured appropriately.
Flat-felled seams
A flat-felled seam encloses the raw edges and typically uses multiple rows of stitching. It can provide a neat, robust finish for suitable fabrics, although it creates additional bulk and may be difficult to manage around tight curves.
French seams
French seams enclose the raw edges through a two-stage sewing process. They can provide a clean interior on lightweight fabrics but may add bulk where several seams meet, particularly around the casing.
Bound seams
Binding covers the raw edge with an additional strip of material. It can improve the interior finish and help contain fraying, but it adds material and another sewing operation.
Plain seams with pressed allowances
These use a straightforward seam with the allowances pressed to one side or open. They may suit economical constructions when the material and intended use allow them, but exposed raw edges require appropriate management.
The right seam depends on the fabric, desired appearance, expected use, and cost target. No single finish is ideal for every drawstring bag.
5.2 Stitch Density and Sewing Specifications
Stitch density, commonly expressed as stitches per inch (SPI), is one part of the sewing specification. It should not be selected independently of the material and thread.
The appropriate setup depends on factors such as:
- Fabric thickness and construction.
- Coatings or surface treatments.
- Thread size and material.
- Needle size.
- Stitch type and seam geometry.
- The loads and abrasion expected during use.
A high stitch count does not automatically create a stronger seam. Excessive needle penetration can damage some fabrics, while insufficient stitching or poor seam finishing may allow the seam to open.
For a custom order, confirm the required seam finish, thread specification, stitch density where relevant, seam allowance, and method for securing seam ends. The finished sample should be evaluated for appearance and performance under an agreed test method.
5.3 Reinforcement Methods and Their Applications
| Method | Main purpose | Typical location | Key consideration |
|---|---|---|---|
| Bar tack | Secures a short, high-stress area | Cord anchors, seam gaps | Position and stitch pattern |
| Box-X stitching | Distributes load across a larger attachment | Anchor patches and webbing | Box dimensions and fabric compatibility |
| Parallel stitch rows | Spreads load over a wider area | Carrying attachments | Spacing and fabric puckering |
| Perimeter stitching | Secures the edges of a reinforcement patch | Anchor patches | Patch shape and stitch placement |
| Fabric or webbing patch | Adds material behind a high-stress area | Anchors and eyelets | Patch size, material, and orientation |
| Interfacing | Adds local stiffness | Base and hardware backing | Avoiding unwanted stiffness in the casing |
Reinforcement should be placed where the force enters or changes direction. On a full-loop backpack, that usually means paying particular attention to the lower anchors and surrounding corners.
A reinforcement patch should be large enough to distribute the load without interfering with the bag’s intended flexibility. Its shape, edge treatment, and stitching pattern all contribute to the result.
6. Linings, Interfacing, and Pockets
Additional components can improve the appearance and functionality of a drawstring bag, but they also change its construction.
A lining adds another layer to the body and often affects how the casing is assembled. Interfacing can improve shape retention, while pockets introduce additional panels and seams.
6.1 Unlined Construction
An unlined bag uses the outer fabric as the main body, with the raw edges managed by the selected seam finish.
This approach is suitable for many promotional bags, simple storage pouches, produce bags, and lightweight packaging.
It minimizes additional materials and assembly steps. However, the interior seams remain visible, so edge finishing and thread appearance may matter more.
6.2 Bagged Lining
A bagged lining is sewn into the outer shell and turned so the raw edges are concealed. The method can produce a clean interior, making it suitable for retail products, gift packaging, and certain cosmetic or dust bags.
The casing must be designed to accommodate the lining. If the casing is developed for a single fabric layer and the lining is added later, the cord passage may become too tight.
The turning sequence and the placement of any turning gap also need to be considered during sampling.
6.3 Drop-In Lining
A drop-in lining is made as a separate inner bag and attached around the opening, often with a seam or binding.
This approach can simplify some assembly sequences, but the attachment around the mouth may add bulk or reduce the available opening width. The design must preserve sufficient clearance for the drawcord.
The choice between bagged and drop-in lining should depend on the intended interior finish, casing construction, and production requirements.
6.4 Interfacing and Stiffening
Interfacing can help a base retain its shape or provide backing behind an eyelet or anchor patch.
However, stiffness should be applied selectively. A stiffened base may be useful when the bag needs to stand, while stiffening the entire casing may make the opening difficult to gather.
For this reason, base stiffening and anchor reinforcement should be considered separately from the casing design.
6.5 Adding Pockets and Other Features
A front pocket, inner pocket, divider, or bottle compartment may improve organization, but each addition introduces new construction requirements.
Before adding a feature, consider whether it interferes with the cord path, anchor positions, or main seams. A pocket seam that crosses a load-bearing area may affect how force is transferred through the body.
Additional features should solve a specific functional problem rather than simply increase the number of components.
One important limitation: a lining does not automatically make a drawstring bag waterproof. Water can still enter through seams, cord exits, and the gathered opening. If moisture protection is essential, the material, seam construction, closure, and finished-bag performance must all be considered together.
7. Drawstring Bag Styles: Classifying by Construction
Retail style names often overlap. Terms such as cinch sack, stuff sack, dust bag, and drawstring pouch may describe different products depending on the supplier.
For sourcing, the construction signature is more useful than the name alone.
| Style | Typical construction | Cord arrangement | Key specification |
|---|---|---|---|
| Flat pouch | Two panels or a folded panel, without built-in depth | Single or double | Finished dimensions and seam finish |
| Gusseted pouch | Body panels with a bottom or side gusset | Single or double | Gusset depth and panel layout |
| Boxed-bottom pouch | Flat body with formed bottom corners | Single or double | Base dimensions and shape retention |
| Round-bottom pouch | Body joined to a circular base | Single or double | Base diameter and seam alignment |
| Barrel bag | Cylindrical body with circular end construction | Single or double | Body circumference, height, and end dimensions |
| Cinch sack | Simple body with a top-cinch closure | Usually single or double | Cord routing and intended load |
| Drawstring backpack | Body with a full-loop carrying cord and lower anchors | Full-loop | Cord comfort, anchor construction, reinforcement |
| Stuff sack | Tube-like or shaped body with a top closure | Usually single | Contents, closure, and intended protection |
| Duffel-style drawstring bag | Cylindrical or elongated body, sometimes with separate handles | Varies | Load-bearing handles and body construction |
These categories can overlap. A cinch sack may be a simple promotional pouch, while a drawstring backpack may use the same basic closure but include reinforced lower anchors and a carrying configuration.
Likewise, a stuff sack is not automatically a compression bag or waterproof bag. Those functions require additional design features and performance verification.
When a style name is ambiguous, provide a reference photograph or sample and identify the panel layout, bottom geometry, cord path, and attachment points. This is more reliable than assuming every supplier interprets the name in the same way.
8. Custom Drawstring Bag Design Options
Once the basic construction has been selected, buyers can specify the details that determine how the finished product looks and performs.
The most efficient approach is to separate structural decisions from decoration and packaging decisions. This makes it easier to compare quotations and identify which changes affect the sample or production process.
8.1 Fabric and Material
Common material choices include cotton, canvas, polyester, non-woven fabric, and mesh. The best option depends on the intended contents, appearance, handling requirements, and expected frequency of use.
When requesting a quotation, specify the material composition, fabric weight or applicable denier specification, surface finish, and any required coating.
Do not assume that a heavier fabric will solve every durability issue. If the failure occurs at a cord anchor, eyelet, or seam, the attachment design may need more attention than the body material.
For a broader introduction to drawstring bag materials and applications, see What Is a Drawstring Bag?.
8.2 Finished Dimensions and Proportions
Finished width and height should be defined together with the bottom depth and casing height.
For flat pouches, width and height may be sufficient to describe the basic shape. For gusseted or cylindrical bags, additional measurements are needed to define the usable volume.
Buyers should confirm:
- Finished width and height.
- Bottom or side gusset depth.
- Casing height and usable height.
- Opening dimensions when the bag is fully open.
- The measurement method and acceptable tolerance.
If the bag must hold a specific product, testing with the actual contents can reveal problems that a dimension drawing alone may not identify.
8.3 Cord, Hardware, and Closure Options
Cord material, diameter, length, and end finish should be selected according to the function.
A lightweight pouch may require only a simple cord and finished knot. A retail bag may benefit from a cord lock or decorative end treatment. A backpack-style bag needs greater attention to carrying comfort and anchor performance.
For hardware, identify the intended component using dimensions or a reference drawing. Terms such as eyelet and grommet are not used consistently across all supply chains, so relying on the name alone can create avoidable sample differences.
8.4 Printing, Branding, and Surface Design
Logo placement and decoration can affect how the panels are prepared and how the finished bag is assembled.
Consider the relationship between the artwork, seams, casing, and usable print area. A large print may need to be positioned carefully to avoid being distorted by the gathered top or hidden by a gusset.
Decoration should be specified separately from construction, including the method, print area, number of colours where applicable, and artwork requirements.
For a detailed comparison of decoration methods, see the relevant guide to screen printing versus heat transfer. This article focuses on how decoration fits into the structural design rather than repeating the technical details of each printing process.
8.5 Functional Add-Ons
Possible additions include:
- Inner or outer pockets.
- Lining and interior dividers.
- Reinforcement patches.
- Webbing handles or separate shoulder straps.
- Cord locks, toggles, and decorative cord ends.
- Labels, hang tags, and retail packaging.
Each addition should be evaluated for its functional value and its effect on the construction. A pocket that crosses an anchor area, for example, may require the panel layout to be revised.
The best design is not necessarily the one with the most features. It is the one in which the structure, materials, and components support the intended use without introducing unnecessary complexity.
9. How to Choose the Right Construction for Your Application
The most suitable construction depends on what the bag needs to hold, how it will be carried, and how frequently it will be used.
9.1 For Gift Bags and Product Packaging
A flat or lightly gusseted pouch is often sufficient for lightweight products, promotional items, and gift packaging.
The main priorities are usually appearance, convenient opening and closing, appropriate dimensions, and a clean interior finish.
A double drawstring can be useful when balanced gathering is important. A lining or upgraded cord may be worthwhile for retail presentation, but neither should be added automatically without considering the product and budget.
9.2 For Dust Bags and Storage Pouches
A flat or shaped pouch may work well for clothing accessories, shoes, and other products that need a protective storage layer.
The material should suit the item being stored, and the dimensions should allow the product to enter and leave without excessive friction.
If the bag is intended to protect a product from dust or surface abrasion, specify the fabric and closure accordingly. Do not describe an ordinary drawstring closure as airtight or waterproof.
9.3 For Gym Sacks and Promotional Backpacks
A backpack-style construction requires a full-loop cord arrangement or another defined carrying system.
Cord comfort, lower anchors, seam strength, and reinforcement should be considered together. A bag designed to carry sportswear has different structural requirements from a lightweight pouch used to distribute event merchandise.
The finished sample should be tested under an agreed load and carrying condition before production approval.
9.4 For Bulky or Shaped Contents
A gusseted, boxed-bottom, round-bottom, or barrel-style design may provide more appropriate space than a flat pouch.
The choice should follow the geometry of the contents. A rectangular product may benefit from a defined base, while a cylindrical item may fit better in a round-bottom or barrel construction.
More depth is not always better: additional panels increase material use and create more seams. Select the simplest structure that accommodates the intended product reliably.
9.5 Balancing Function, Appearance, and Production Complexity
When comparing options, consider three questions:
- Does the structure provide the required space and functionality?
- Will the materials, seams, and attachments withstand the intended use?
- Does each additional feature justify its effect on sampling, production, and cost?
For example, adding a reinforced anchor to a carrying bag may be more valuable than upgrading the entire body fabric. A cord lock may be worthwhile when the bag must remain closed during transit, while decorative stitching at a flexible point may add complexity without improving performance.
The goal is to specify the required result, not simply to select the most elaborate construction.
10. Drawstring Bag Quality Checks and Common Failure Points
A good specification should identify not only how the bag is made but also how the finished sample will be evaluated.
Most construction problems occur where movement, friction, or force is concentrated.
| Location | Common problem | Potential cause | What to check |
|---|---|---|---|
| Shoulder or hand contact | Cord feels uncomfortable | Cord too narrow or unsuitable for the load | Cord section, width, and loaded carrying comfort |
| Casing | Opening gathers unevenly or cord sticks | Insufficient clearance, bulky seams, unsuitable cord | Repeated opening and closing |
| Cord exit | Fraying or localized wear | Abrasion, poor edge finish, inadequate reinforcement | Exit finish and cord condition |
| Lower anchor | Cord pulls through or fabric tears | Concentrated load or inadequate reinforcement | Anchor construction and surrounding fabric |
| Cord lock | Closure slips | Hardware unsuitable for the cord or working load | Holding performance under agreed conditions |
| Side or bottom seam | Seam opens or corner tears | Seam construction, allowance, or stress concentration | Seam appearance and agreed pull test |
| Base | Bag does not hold its intended shape | Unsuitable bottom geometry or insufficient stiffness | Filled sample and base stability |
10.1 Closure and Cord-Movement Checks
Open and close the sample repeatedly. Observe whether the cord moves smoothly, whether the fabric gathers consistently, and whether the opening remains in the intended position.
If the cord catches, inspect the casing clearance and internal seam allowances before increasing the casing height. A larger casing is not automatically a better solution if it makes the bag harder to keep closed.
10.2 Anchor and Seam Checks
For a carrying bag, inspect the anchor position, reinforcement patch, stitch pattern, and surrounding fabric.
A visual check should be supplemented by an agreed test appropriate to the product. Depending on the intended use, this may include a static loaded hang, repeated lifting, or a local anchor pull test.
10.3 Agreeing on a Test Protocol
There is no single load or cycle count that is appropriate for every drawstring bag. Test conditions should be agreed between the buyer and manufacturer according to the intended contents, construction, and market requirements.
A practical sample evaluation may include:
| Test | Purpose | What to record |
|---|---|---|
| Closure cycling | Evaluate cord movement and casing performance | Smoothness, wear, and closure consistency |
| Loaded carry | Evaluate comfort and attachment performance | Cord comfort, anchor movement, visible damage |
| Static loaded hang | Check for deformation or tearing under sustained load | Seam condition, stretching, and permanent distortion |
| Anchor inspection | Assess high-stress attachment points | Stitch damage, patch movement, fabric tearing |
| Exit abrasion check | Identify wear where the cord contacts the bag | Fraying, surface damage, and cord deterioration |
| Shape recovery | Assess how the bag returns after use | Distortion, creasing, and casing deformation |
These are suggested evaluation methods, not universal industry acceptance standards. The load, duration, number of cycles, and pass/fail criteria should be documented before the sample is approved.
Material or seam test standards may provide useful information about individual components, but they do not automatically establish the carrying capacity of the completed bag. A load-bearing claim should be supported by a suitable finished-product test.
11. What to Specify Before Requesting a Custom Drawstring Bag Quote
A quotation is only as precise as the product brief. If key construction details are missing, a manufacturer must make assumptions about the materials, dimensions, attachments, and finish.
Use the following checklist to prepare a more complete inquiry.
Bag Body
- Finished width and height.
- Usable height and opening dimensions, where relevant.
- Fabric composition, weight, and surface finish.
- Number and arrangement of panels.
- Bottom construction and gusset depth, if applicable.
Casing and Cord
- Casing height and acceptable tolerance.
- Tunnel layout and clear internal passage.
- Fold and finishing method.
- Cord material, construction, and diameter or width.
- Cord length, exposed tail length, and carrying loop length, where applicable.
- Cord-end finish and any cord lock or toggle.
Exits and Reinforcement
- Cord exit type and dimensions.
- Anchor positions and attachment method.
- Reinforcement material, dimensions, and stitch pattern.
- Required seam finish and relevant sewing specifications.
Additional Features
- Lining type and fabric.
- Pocket dimensions and positions.
- Separate handles or straps.
- Printing method, artwork, placement, and colour requirements.
- Labels, individual packing, and carton requirements.
Sample Approval and Acceptance
- Reference sample, drawing, or annotated photographs.
- Required functional checks and test conditions.
- Acceptance criteria for dimensions, appearance, and construction.
- Applicable order quantity and production schedule.
If you are working from an existing bag rather than a technical drawing, provide clear photographs of four areas: the opening and casing, cord exit, lower anchor if present, and bottom. These details help the manufacturer understand the construction before preparing a sample.
For a custom order, INITI’s typical starting quantity is 1,000 pieces. Sampling generally takes approximately seven days, and bulk production is typically around 25 days after sample approval. These are planning references rather than guaranteed lead times; the applicable quantity and schedule depend on the materials, construction, decoration, and order requirements.
To discuss a project, share your reference design and key specifications through the INITI Packing contact page, or review the available options on the custom drawstring bag product page.
Frequently Asked Questions
What are the main parts of a drawstring bag?
The six functional components are the body, casing, cord, cord exit, anchor, and reinforcement. A basic pouch may not require separate anchors, while a full-loop drawstring backpack needs a suitable lower attachment system.
What is the difference between a casing and a channel?
The casing is the folded and stitched fabric structure at the opening. The channel is the passage inside the casing through which the cord moves. When specifying a custom bag, define the finished casing height and the clear internal passage separately.
Is a single or double drawstring better?
Neither is universally better. A single cord can suit simple pouches and lightweight packaging, while two cords may provide more balanced gathering. The choice depends on the intended closure, cord routing, and overall design.
What is the difference between a cinch sack and a drawstring backpack?
The terms can overlap in retail catalogues. A simple cinch sack may use a top closure without lower carrying anchors, whereas a typical drawstring backpack uses a full-loop cord arrangement attached near the lower corners. The construction should be confirmed rather than inferred from the product name.
Should I choose an eyelet or a stitched channel?
A metal eyelet provides a hard contact surface for the cord and may be appropriate for repeated use, provided the hardware and backing are suitable. A stitched channel avoids separate metal hardware and can suit simpler, lightweight designs. The decision should account for abrasion, load, construction, and cost.
How tall should a drawstring casing be?
There is no universal casing height. The correct dimension depends on the cord, number of fabric layers, seam allowances, material finish, and required gathering performance. Confirm the finished height and tolerance, then test cord movement on the sample.
Which bottom construction is strongest?
There is no single strongest bottom for every application. Durability depends on the material, seam layout, reinforcement, load direction, and intended use. A shaped or gusseted base can provide more volume, but its seams and corners must also be designed appropriately.
Does a lining make a drawstring bag waterproof?
No. A lining may improve the interior finish or provide another layer, but water can still enter through seams, cord exits, and the gathered opening. Waterproof performance requires a suitable overall construction and appropriate testing.
What should I confirm before approving a sample?
Confirm the finished dimensions, fabric, panel layout, bottom construction, casing and cord arrangement, seam finish, reinforcement, decoration, and packing. For bags that will carry weight, agree on the relevant functional checks and acceptance criteria before approving production.
Conclusion
Drawstring bag construction is a system of interconnected components rather than a single style choice. The body determines the available space, the cord and casing control closure performance, the bottom defines the shape, and the exits, anchors, seams, and reinforcement determine how the bag behaves under repeated use.
For custom orders, the most reliable approach is to specify the construction rather than rely on a catalogue name. Confirm the panel layout, bottom geometry, cord path, casing dimensions, attachment points, and finishing requirements before sampling.
A clear specification helps the manufacturer prepare a more accurate sample and quotation, while an agreed inspection method helps both parties evaluate the finished product against the same requirements. When those details are settled early, it becomes easier to balance function, appearance, production complexity, and cost.

 English
 French
 German
 Japanese
 Arabic
 Thai
 Vietnamese
 Russian
 Spanish
 Portuguese